I've gone back and forth on a couple things lately.
Number 1: Insulation. While I think closed cell, sprayed in insulation would be the best solution, it’s far from the least expensive. I’ve also been worried that for some reason I need to get into the electrical in the future, having everything encapsulated in insulation would present a problem.
So when I started the 110 electrical, it was with the intention of using sprayed in insulation. I enclosed the wire in “smurf” tube so that, theoretically, the problem wire could be pulled out and the new wire installed in its place. It was nearly impossible to push the wire through the smurf tube before it was installed in the walls so I don’t see pulling wire through later as an option. I have sense abandoned the smurf tube idea.
I decided that I would go with Polyiso insulation sheets. It has the highest R-value per inch of any rigid insulation. About 7 per inch. With 2 ½” thickness I’m getting an R-value of 17.5. I bought 10 sheets used for $105. I’ll need an additional 10 sheets to finish.

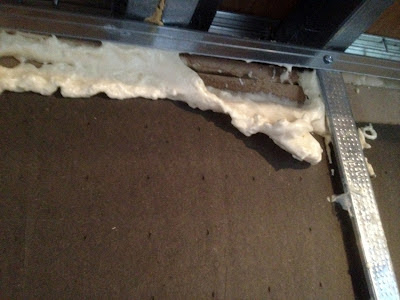
Now here’s the trick. Once I cut and installed the panels, I went back with cans of spray foam and filled the cracks and openings. When the foam expands and hardens, it adds support and strength as well as fills in all the nooks and crannies.
 The other thing that’s been bugging me
 lately is trying to use all repurposed and/or recycled materials. I think this idea is great in theory, but I’ve decided that there are some places it just doesn’t make sense. Electrical for instance. It wouldn’t be smart to install used outlets and switches, only to have to reinstalled new ones later. Moving forward, I’ll be using recycled building supplies sometimes, and new when it makes sense for longevity and performance.
I had a busy weekend working on the Tint Casita. I finished the 110v wiring, which much like a typical RV, will work only when the transformer is plugged into a power supply. I installed two outlets in the bedroom, 1 in the loft, 4 in the kitchen, and 1 in the bathroom and 2 in the living room.
The 9V wiring, which will be attached to golf cart batteries that will be charged by the solar kit, will only be used for lighting. I finished about half of the 9v wiring today too. The stove, fridge and hot water heater are all propane. I'll finish the rest of the 9v wiring this week and, even though the wiring will be under the paneling, I'll spend a few hours getting things neat and tidy. It's a bit of a mess right now.

One of the things I learned (the hard way) is that even when using used, and inconsistent metal studs, its best to at least try and line-up the holes so that when installing the electrical lines, the wire passes through easily and evenly. My wires will look a little messy and uneven, but thankfully, will be covered by the paneling. Also, the metal studs have sharp edges that may cut the wires. Don't forget to use the special grommets they make especially for metal studs. I’ll also go back and spray foam the areas where the wires pass through the studs. I hope that this will protect them.


